Sunday 24 July 2011

Pancakes? Plain sailing!

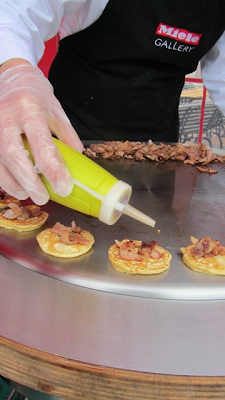
Many early morning visitors to last week’s Volvo Dun Laoghaire Regatta were treated to breakfast cooked by me in the Butler’s Pantry tent at the Royal St George’s Yacht Club.

I was using the Miele mobile Teppan hot plate to cook up some hearty but healthy early morning food to keep the competition sailors going until lunchtime when they could tuck into their Butler’s Pantry lunch bags. As the weekend went on, it became clear that I was also helping to cure a few hungover sore heads!!

I used the opportunity to serve up some of my favourite cooked breakfast/brunch recipes:
  1. Potato cakes topped with smoked salmon, crème fraiche and chopped chives
  2. Pancakes with a summer berry compote (frozen summer berries, warmed in a pan with a little icing sugar)
  3. Sweet blueberry pancakes dusted with icing sugar
  4. Apple pancakes, dusted with cinnamon and icing sugar.
  5. These buttermilk pancakes (see below) were a huge hit on Sunday morning and anyone passing the tent was drawn in by the smell of bacon frying!
Tips:
  1. They are a delicious, thick but light pancake and are best served immediately.
  2. Buy the best maple syrup you can – the cheaper varieties just don’t taste the same.
  3. Make the batter at the last minute – this is not a batter that needs to/benefits from sitting overnight. The baking powder does its work immediately so it needs to be used straight away.
  4. Plan ahead now for a Sunday morning treat – bacon can go in the freezer and cartons of buttermilk will last a couple of weeks in the fridge so you should be able to make these at short notice!


Canadian buttermilk pancakes with bacon and maple syrup

Makes 30 small pancakes

Ingredients
Maple cured or smoked bacon

Sieved together:
325g plain flour
1 teaspoon baking powder
Good pinch of salt

250ml buttermilk
6 eggs

To serve:
Good maple syrup

Method
Heat a frying pan on a high heat and add a little sunflower or other tasteless oil.
Cut the bacon into three or four large pieces per slice and fry until crispy. Drain on kitchen paper and keep warm.

Meanwhile, place the flour, salt and baking powder in a large bowl and gently whisk to mix well.
Break the eggs into a large jug with the buttermilk and whisk well.
Slowly add in the buttermilk and eggs to the flour, whisking gently until the batter is smooth but thick. Pour some of the batter into a measuring jug for pouring out the batter.

Heat a non-stick frying pan over a moderate heat and rub generously with sunflower oil on kitchen paper.
Pour out a little amount of the batter at a time to make small pancakes. Cook 5-6 at a time, turning after about a minute. They should take no more than 2 minutes. Drain on kitchen paper, top with a slice of crispy bacon and a generous drizzle of maple syrup. Serve immediately while warm.

Monday 27 June 2011

Zing when you're winning!

I spent last Wednesday evening at the fabulous showrooms of Celtic Interiors, Douglas, Cork to give a demonstration of Miele appliances to invited guests. Celtic Interiors has just won the 2011 Master Retailer award in the Kitchen Retailer Ireland Awards and the demonstration kitchen was a real treat to work in!

One of the desserts I made was these zingy mini lemon tartlets – they are always a big hit and so simple to make.
This recipe suits a large tart tin, individual tins or (mini) cupcake tins for a sweet canapé.

TIPS: As always, the key is preparation....
  1. The sweet shortcrust pastry can be made and frozen or chilled in advance, I even roll it out and line a greased tart tin and chill or freeze it, covered in cling film. The same applies to individual tartlet tins. For the canapé size, I cut out circles to fit a greased (mini) cupcake tin and either freeze them in the tin or flat on a tray for a quick defrost later if I don’t want have a tray to spare.
  2. The lemon filling is the most delicious lemon curd and perfect to sandwich a chocolate cake or add to whipped cream in a meringue roulade. Any leftover lemon curd need not go to waste - I sterilise an empty jam jar (using the steam oven or a hot oven or boiling water) and keep it for up to a week unopened in the fridge.  
  3. Freeze any leftover pastry for another day – flatten it before freezing so that it won’t take so long to defrost!
  4. Roll the pastry between 2 sheets of cling film – it prevents sticking and keeps your rolling pin and worktop cleaner! It also means you don’t need to add extra flour which can dry out your pastry.)
Lemon Tart
Serves 8-10

Ingredients
350g plain flour
220g butter, diced
100g icing sugar
2 large eggs (you may not need all)
Eggs, beaten for egg wash

Filling:
grated zest and juice of 3 lemons
165g caster sugar
6 eggs
150g butter, diced

Method
To make the pastry, rub the butter into the flour until it resembles coarse breadcrumbs. Add the icing sugar, then just enough egg to form a smooth but not wet dough.
Wrap the dough in cling film, flatten well and chill in the refrigerator for at least 30 minutes or freeze until required.

Preheat the oven to 180C on Fan.

Roll out the pastry finely between 2 sheets of cling film and use it to line a greased large tart case. Prick the base with a fork, then cover with cling film and chill until required.

Line the pastry with cling film, fill with rice and bake blind for 10-12 minutes until firm. Remove the cling film and rice and brush the base with a little beaten egg (egg wash) before returning to the oven for 4-5 minutes so that the base is well-sealed.

To make the filling, place the lemon zest and juice, sugar and eggs into a saucepan.
Whisk constantly over a medium heat until the mixture is hot and smooth.
Whisk in the butter a little at a time until the mixture is thick.
Remove from the heat and whisk occasionally as it cools.

Pour the mixture (hot or cold) into the pastry case and bake the lemon tart until set, around 30 minutes.

The (mini) cupcake cases need not be blind baked, just chill the pastry shells in the baking tin, then fill with lemon curd and bake for about 10 minutes.

Sift a little icing sugar to garnish before serving. Add a sprig of mint if you like!


Saturday 25 June 2011

The blog has landed!

So finally I get to host my own little foodie home to share recipes, photos, tips and ideas. Of course this will mean even more recipe testing and tasting than before - hey, it's a dirty job but someone has to do it!

For those that don't know me, I am a chef and cookery teacher who loves to encourage cooking healthy, fun and delicious food for all! It can be simple, quick and tasty meals or something which requires a little more effort - there's a time and a place for both! But with a few tips and new skills here and there, it should always be enjoyable.

What I love is that every day is different - I can be teaching children, teenagers, Transition Year students, adults, a dinner party or corporate group of guests. Or on my 'day off', testing and photographing new recipes and trying out new things.

The terms 'fresh', 'seasonal' and 'local' may be overused these days but really it's the most natural way to grow, shop, cook and eat. I love to grow what I can and most other food can be sourced easily through some of my foodie friends.

So there really is no excuse - let's get cooking!